![]()
Reprint from THE "HOW-TO-DO-IT" BOOKSCARPENTRY FOR BOYS
|
I - II - III - IV - V - VI - VII - VIII - IX - X - XI - XII - XIII - XIV - XV - XVI - XVII - XVIII - XIX - XX - XXI
CHAPTER VI
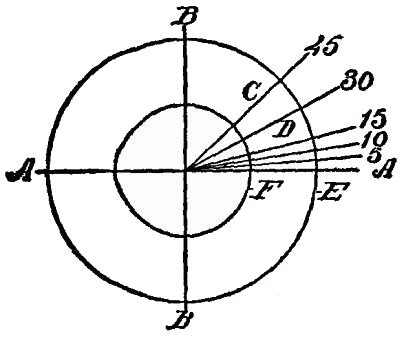
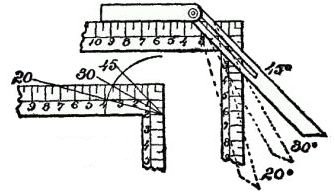
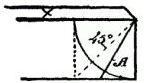
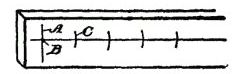
THE USES OF THE COMPASS AND THE SQUAREThe Square.—The square is, probably, the oldest of all tools, and that, together with the compass, or dividers, with which the square is always associated, has constituted the craftsman's emblem from the earliest historical times. So far as we now know, the plain flat form, which has at least one right angle and two or more straight edges, was the only form of square used by the workman. But modern uses, and the development of joinery and cabinet making, as well as the more advanced forms of machinery practice, necessitated new structural forms in the square, so that the bevel square, in which there is an adjustable blade set in a handle, was found necessary. The Try Square.—In the use of the ordinary large metal square it is necessary to lay the short limb of the square on the face of the work, and the long limb must, therefore, rest against the work side or edge of the timber, so that the scribing edge of the short limb does not rest flat against the work. As such a tool is defective in work requiring accuracy, it brought into existence what is called the try square, which has a rectangular handle, usually of wood, into which is fitted at one end a metal blade, which is at right angles to the edge of the handle. The handle, therefore, always serves as a guide for the blade in scribing work, because it lies flat down on the work. The T-Square is another modification of the try square, its principal use being for draughting purposes. The Compass.—The compass is one of the original carpenter's tools. The difference between compass and dividers is that compasses have adjustable pen or pencil points, whereas dividers are without adjustable points. Modern work has brought refinements in the character of the compass and dividers, so that we now have the bow-compass, which is, usually, a small tool, one leg of which carries a pen or pencil point, the two legs being secured together, usually, by a spring bow, or by a hinged joint with a spring attachment. Proportional Dividers.—A useful tool is called the proportional dividers, the legs of which are hinged together intermediate the ends, so that the pivotal joint is adjustable. By means of this tool the scale of work may be changed, although its widest field of usefulness is work laid off on a scale which you intend to reduce or enlarge proportionally. Determining Angles.—Now, in order to lay out work the boy should know quickly and accurately how to determine various angles used or required in his work. The quickest way in which to learn this is to become familiar with the degree in its various relations. Definition of Degree.—A degree is not a measure, as we would designate a foot or a pound to determine distance or quantity. It is used to denote a division, space, interval or position. To illustrate, look at the circle, Fig. 51. The four cardinal points are formed by the cross lines (A, B), and in each one of the quadrants thus formed the circle is divided into 90 degrees. Look at the radial lines (C, D), and you will find that the distance between these lines is different along the [Pg 62] curved line (E) than along the curved line (F). The degree is, therefore, to indicate only the space, division or interval in the circle. The Most Important Angle.—Most important for one to know at a glance is that of 45 degrees, because the one can the more readily calculate the other degrees, approximately, by having 45 degrees once fixed in the mind, and impressed on the visual image. With a square and a compass it is a comparatively easy matter accurately to step off 45 degrees, as it is the line C, midway between A and B, and the other degrees may be calculated from the line C and the cardinal lines A or B. Degrees Without a Compass.—But in the absence of a compass and when you do not wish to step off a circle, you will in such case lay down the square, and mark off at the outer margin of the limbs two equal dimensions. Suppose we take 2 inches on each limb of the square. The angle thus formed by the angle square blade is 45 degrees. To find 30 degrees allow the blade of the angle square to run from 2 inches on one limb to 3½ inches on the other limb, and it will be found that for 15 degrees the blade runs from 2 inches on one limb to 7½ inches on the other limb. It would be well to fix firmly these three points, at least, in your mind, as they will be of the utmost value to you. It is a comparatively easy matter now to [Pg 63] find 10 degrees or 25 degrees, or any intermediate line. What Degrees Are Calculated From.—The question that now arises is what line one may use from which to calculate degrees, or at what point in the circle zero is placed. Degrees may be calculated either from the horizontal or from the vertical line. Examine Fig. 53. The working margin indicated by the cross mark is your base line, and in specifying an angle you calculate it from the work edge. Thus, the line A indicates an angle of 30 degrees. The dotted line is 45 degrees. The Dividers.—The dividers are used not only for scribing circles, but also for stepping and dividing spaces equally. There is a knack in the use of the dividers, where accuracy is wanted, and where the surface is of wood. Unless the utmost care is observed, the spaces will be unequal, for the reason that the point of the dividers will sink more deeply into the wood at some places than at others, due to the uneven texture of the wood grain. It will be better to make a line lengthwise, and a cross line (A) for starting (see Fig. 54). You may then insert one point of the dividers at the initial mark (B), and describe a small arc (C). Then move the dividers over to the intersection of the arc (C) on the line, and make the next mark, and so on. Some useful hints along this same line will be found under the chapter on Drawing, which should be carefully studied. Chapter 7, How the Different Structural Parts are Designated |