![]()
Reprint from THE "HOW-TO-DO-IT" BOOKSCARPENTRY FOR BOYS
|
I - II - III - IV - V - VI - VII - VIII - IX - X - XI - XII - XIII - XIV - XV - XVI - XVII - XVIII - XIX - XX - XXI
CHAPTER III
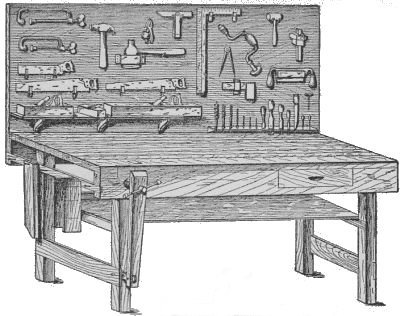
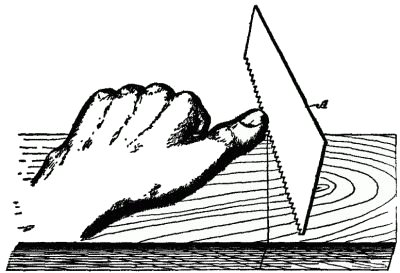
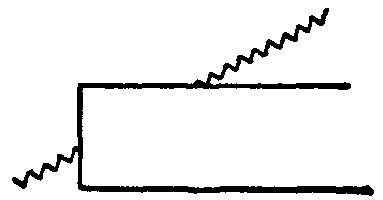
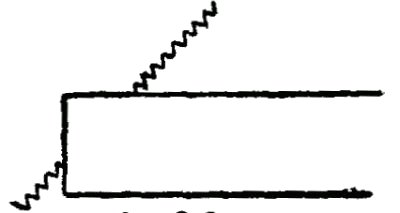
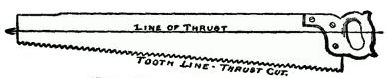
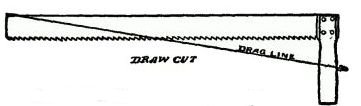
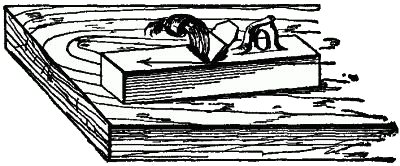
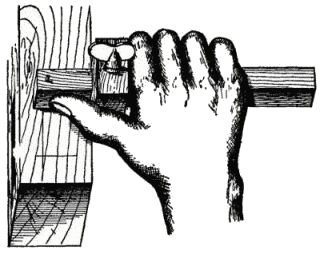
HOW TO HOLD AND HANDLE TOOLSObservation may form part of each boy's lesson, but when it comes to the handling of tools, practice becomes the only available means of making a workman. Fifty years of observation would never make an observer an archer or a marksman, nor would it enable him to shoe a horse or to build a table. It sometimes happens that an apprentice will, with little observation, seize a saw in the proper way, or hold a plane in the correct manner, and, in time, the watchful boy will acquire fairly correct habits. But why put in useless time and labor in order to gain that which a few well-directed hints and examples will convey? Tools are made and are used as short cuts toward a desired end. Before the saw was invented the knife was used laboriously to sever and shape the materials. Before planes were invented a broad, flat sharpened blade was used to smooth off surfaces. Holes were dug out by means of small chisels requiring infinite patience and time. Each succeeding tool proclaimed a shorter and an easier way to do a certain thing. The man or boy who can make a new labor-saving tool is worthy of as much praise as the man who makes two blades of grass grow where one grew before. Let us now thoroughly understand how to hold and use each tool. That is half the value of the tool itself. The Saw.—With such a commonplace article as the saw, it might be assumed that the ordinary apprentice would look upon instruction with a smile of derision. How to Start a Saw.—If the untried apprentice has such an opinion set him to work at the task of cutting off a board accurately on a line. He will generally make a failure of the attempt to start the saw true to the line, to say nothing of following the line so the kerf is true and square with the board. How to Start on a Line.—The first mistake he makes is to saw on the line. This should never be done. The work should be so laid out that the saw kerf is on the discarded side of the material. The saw should cut alongside the line, and the line should not be obliterated in the cutting. Material must be left for trimming and finishing. The First Stroke.—Now, to hold the saw in starting is the difficult task to the beginner. Once mastered it is simple and easy. The only time in which the saw should be firmly held by the hand is during the initial cut or two; afterwards always hold the handle loosely. There is nothing so tiring as a tightly grasped saw. The saw has but one handle, hence it is designed to be used with one hand. Sometimes, with long and tiresome jobs, in ripping, two hands may be used, but one hand can always control a saw better than two hands. The Starting Cut.—In order to make our understanding of the starting cut more explicit, we refer to Fig. 20, in which the thumb of the left hand is shown in the position of a guide—the end of the thumb being held up a sufficient distance to [Pg 32] clear the teeth. In this position you need not fear that the teeth of the saw (A) will ride up over the thumb if you have a firm grasp of the saw handle. The first stroke should be upwardly, not downwardly. While in the act of drawing up the saw you can judge whether the saw blade is held by the thumb gage in the proper position to cut along the mark, and when the saw moves downwardly for the first cut, you may be assured that the cut is accurate, or at the right place, and the thumb should be kept in its position until two or three cuts are made, and the work is then fairly started. For Cross-cutting.—For ordinary cross-cutting the angle of the saw should be at 45 degrees. For ripping, the best results are found at less than 45 degrees, but you should avoid flattening down the angle. An incorrect as well as a correct angle are shown in Figs. 21 and 22. Forcing a Saw.—Forcing a saw through the wood means a crooked kerf. The more nearly the saw is held at right angles to a board, the greater is the force which must be applied to it by the hand to cause it to bite into the wood; and, on the other hand, if the saw is laid down too far, as shown in the incorrect way, it is a very difficult matter to follow the working line. Furthermore, it is a hard matter to control the saw so that it will cut squarely along the board, particularly when ripping. The eye must be the only guide in the disposition of the saw. Some boys make the saw run in one direction, and others cause it to lean the opposite way. After you have had some experience and know which way you lean, correct your habits by disposing the saw in the opposite direction. The Stroke.—Make a long stroke, using the full blade of the saw. Don't acquire the "jerky" style of sawing. If the handle is held loosely, and the saw is at the proper angle, the weight of the saw, together with the placement of the handle on the saw blade, will be found sufficient to make the requisite cut at each stroke. You will notice that the handle of every saw is mounted nearest the back edge. (See Fig. 23.) The reason for so mounting it is, that as the cutting stroke is downward, the line of thrust is above the tooth line, and as this line is at an angle to the line of thrust, the tendency is to cause the saw teeth to dig into the wood. The Chinese Saw.—This saw is designed to saw with an upward cut, and the illustration (Fig. 24) shows the handle jutting out below the tooth line, in order to cause the teeth to dig into the material as the handle is drawn upwardly. Reference is made to these features to impress upon beginners the value of observation, and to demonstrate the reason for making each tool a particular way. Things to Avoid.—Do not oscillate the saw as you draw it back and forth. This is unnecessary work, and shows impatience in the use of the tool. There is such an infinite variety of use for the different tools that there is no necessity for rendering the work of any particular tool, or tools, burdensome. Each in its proper place, handled intelligently, will become a pleasure, as well as a source of profit. The Plane.—The jack plane and the fore plane are handled with both hands, and the smoothing plane with one hand, but only when used for dressing the ends of boards. For other uses both hands are required. Angles for Holding Planes.—Before commencing to plane a board, always observe the direction in which the grain of the wood runs. This precaution will save many a piece of material, because if the jack plane is set deep it will run into the wood and cause a rough surface, which can be cured only by an extra amount of labor in planing down. Never move the jack plane or the smoothing plane over the work so that the body of the tool is in a direct line with the movement of the plane. It should be held at an angle of about 12 or 15 degrees (see Fig. 25). The fore plane should always be held straight with the movement of the plane, because the length of the fore plane body is used as a straightener for the surface to be finished. Errors to Be Avoided.—Never draw back the plane with the bit resting on the board. This simply wears out the tool, and if there should be any grit on the board it will be sure to ruin the bit. This applies particularly to the jack plane, but is bad practice with the others as well. A work bench is a receptacle for all kinds of dirt. Provide a special ledge or shelf for the planes, and be sure to put each plane there immediately after using. The Gage.—A man, who professed to be a carpenter, once told me that he never used a gage because he could not make it run straight. A few moments' practice convinced him that he never knew how to hold it. The illustration shows how properly to hold it, and the reason why it should so be held follows. You will observe (Fig. 26) that the hand grasps the stem of the gage behind the cheekpiece, so that the thumb is free to press against the side of the stem to the front of the cheekpiece. Holding the Gage.—The hand serves to keep the cheekpiece against the board, while the thumb pushes the gage forward. The hand must not, under any circumstances, be used to move the gage along. In fact, it is not necessary for the fingers to be clasped around the gage stem, if the forefinger presses tightly against the cheekpiece, since the thumb performs all the operation of moving it along. Naturally, the hand grasps the tool in [Pg 38] order to hold it down against the material, and to bring it back for a new cut. The Draw-knife.—It is difficult for the apprentice to become accustomed to handle this useful tool. It is much more serviceable than a hatchet for trimming and paring work. In applying it to the wood always have the tool at an angle with the board, so as to make a slicing cut. This is specially desirable in working close to a line, otherwise there is a liability of cutting over it. This knife requires a firm grasp—firmness of hold is more important than strength in using. The flat side is used wholly for straight edges, and the beveled side for concave surfaces. It is the intermediate tool between the hatchet and the plane, as it has the characteristics of both those tools. It is an ugly, dangerous tool, more to be feared when lying around than when in use. Put it religiously on a rack which protects the entire cutting edge. Keep it off the bench. |