HOW TO GRIND AND SHARPEN TOOLS
Care of Tools.—Dull tools indicate
the character of the workman. In an experience of over forty years, I
have never known a good workman to keep poorly sharpened tools. While it
is true that the capacity to sharpen tools can be acquired only by
practice, correct habits at the start will materially assist. In doing
this part of the artisan's work, it should be understood that there is a
right as well as a wrong way.
There is a principle involved in the sharpening of every tool,
which should be observed. A skilled artisan knows that there is a
particular way to grind the bits of each plane; that the manner of
setting a saw not only contributes to its usefulness, but will
materially add to the life of the saw; that a chisel cannot be made to
do good work unless its cutting edge is square and at the right working
angle.
First Requisite.—A beginner should
never attempt a piece of work until he learns how the different tools
should be sharpened, or at least learn the principle involved. Practice
will make perfect.
Saws.—As the saw is such an important part of the kit, I shall devote some space to the subject. First,
as to setting the saw. The object of this is to make the teeth cut a
wider kerf than the thickness of the blade, and thereby cause the saw to
travel freely. A great many so-called "saw sets" are found in the
market, many of them built on wrong principles, as will be shown, and
these are incapable of setting accurately.
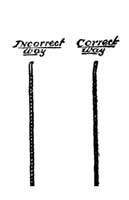 Fig. 10. Fig.10a. Fig. 10. Fig.10a.
How to Set.—To set a saw accurately,
that is, to drive out each tooth the same distance, is the first
requirement, and the second is to bend out the whole tooth, and not the
point only.
In the illustration (Fig. 10), the point is merely bent out. This is wrong. The right way is shown in Fig. 10a.
The whole tooth is bent, showing the correct way of setting. The
reasons for avoiding one way and following the other are: First, that if
the point projects to one side, each point or tooth will dig into the
wood, and produce tooth prints in the wood, which make a roughened
surface. Second, that if there are inequalities in setting the teeth (as
is sure to be the case when only the points are bent out), the most
exposed points will first wear out, and thereby cause saw deterioration.
Third, a saw with the points sticking out causes a heavy, dragging cut,
and means additional labor. Where the whole body of the tooth is bent,
the saw will run smoothly and easily through the kerf and produce a
smooth-cut surface.
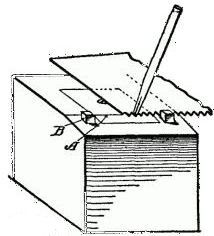 Fig. 11. Fig. 11.
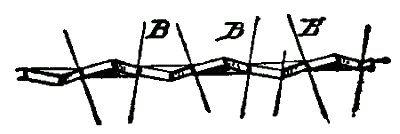 Fig. 12. Fig. 12.
Our illustration (Fig. 11) shows a very simple setting block,
the principal merit of which is that any boy can make it, and in the use
of which he cannot go wrong in setting a tooth.
Simple Saw Setter.—Take a block of
wood, a 4 by 4 inch studding, four inches long. Get a piece of metal
one-half inch thick and two inches square. Have a blacksmith or
machinist bore a quarter-inch hole through it in the center and
countersink the upper side so it may be securely fastened in a mortise
in the block, with its upper side flush with the upper surface of the
block. Now, with a file, finish off one edge, going back for a quarter
of an inch, the angle at A to be about 12 degrees.
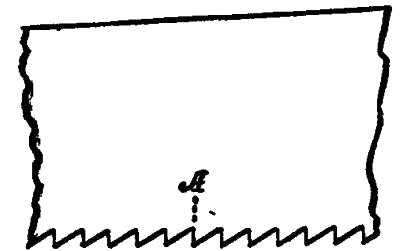 Fig. 13. Rip-Saw Fig. 13. Rip-Saw
Filing Angles.—In its proper place
will be shown how you may easily calculate and measure degrees in work
of this kind. Fig. 12 shows an approximation to the right angle. B, B
(Fig. 11) should be a pair of wooden pegs, driven into the wooden block
on each side of the metal piece. The teeth of the saw rest against the
pegs so that they serve as a guide or a gage, and the teeth of the saw,
therefore, project over the inclined part (B) of the metal block. Now,
with an ordinary punch and a hammer, each alternate tooth may be driven
down until it rests flat on the inclined face (A), so that it is
impossible to set the teeth wrongly. When you glance down the end of a
properly set saw, you will see a V-shaped channel, and if you will place
a needle in the groove and hold the saw at an angle, the needle will
travel down without falling out.
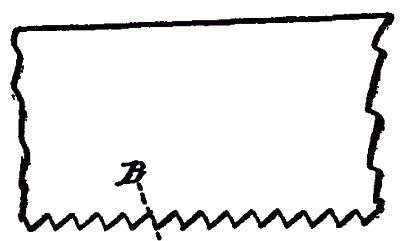 Fig. 14. cross-cut Fig. 14. cross-cut
Filing.—The next step is the filing.
Two things must be observed: the pitch and the angle. By pitch is meant
the inclination of the teeth. Note the illustration (Fig. 13), which
shows the teeth of a rip saw. You will see at A that the pitch of the
tooth is at right angles to the edge of the saw. In Fig. 14, which shows
the teeth of a cross-cut saw, the pitch (B) is about 10 degrees off.
The teeth of the rip saw are also larger than those of the cross-cut.
The Angle of Filing.—By angle is
meant the cutting position of the file. In Fig. 12, the lines B
represent the file disposed at an angle of 12 degrees, not more, for a
rip saw. For a cross-cut the angle of the file may be less.
Saw Clamps.—You may easily make a pair of saw clamps as follows:
Take two pieces of hard wood, each three inches wide,
seven-eighths of an inch thick, and equal in length to the longest saw.
Bevel one edge of each as shown in A (Fig. 15), so as to leave an edge
(B) about one-eighth of an inch thick. At one end cut away the corner on
the side opposite the bevel, as shown at C, so the clamps will fit on
the saw around the saw handle.
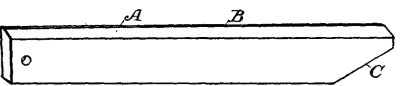 Fig. 15. Fig. 15.
When the saw is placed between these clamps and held together
by the jaws of the vise, you are ready for the filing operation. Observe
the following filing suggestions: Always hold the file horizontal or level. In filing, use the whole length of the file. Do the work by a slow, firm sweep.
Do not file all of the teeth along the saw at one operation,
but only the alternate teeth, so as to keep the file at the same angle,
and thus insure accuracy; then turn the saw and keep the file constantly
at one angle for the alternate set of teeth.
Give the same number of strokes, and exert the same pressure on
the file for each tooth, to insure uniformity. Learn also to make a
free, easy and straight movement back and forth with the file.
The File.—In order to experiment
with the filing motion, take two blocks of wood, and try surfacing them
off with a file. When you place the two filed surfaces together after
the first trial both will be convex, because the hands, in filing,
unless you exert the utmost vigilance, will assume a crank-like
movement. The filing test is so to file the two blocks that they will
fit tightly together without rolling on each other. Before shaping and
planing machines were invented, machinists were compelled to plane down
and accurately finish off surfaces with a file.
In using the files on saws, however small the file may be, one
hand should hold the handle and the other hand the tip of the file.
A file brush should always be kept on hand, as it pays to preserve files by cleaning them.
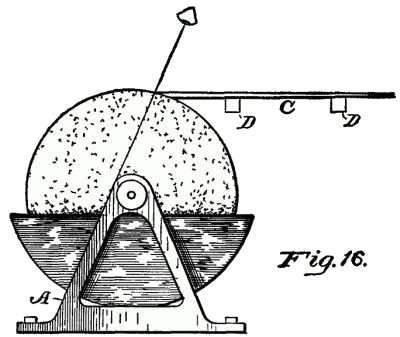 Fig. 16. Fig. 16.
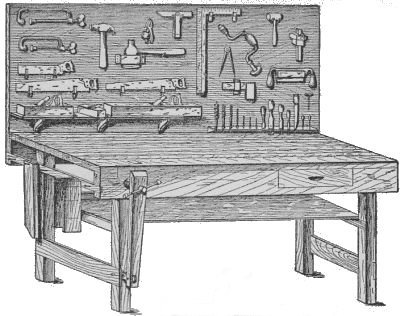
The Grindstone.—As most of the tools
require a grindstone for sharpening purposes, an illustration is given
as a guide, with a diagram to show the proper grinding angle. In Fig. 16
the upright (A) of the frame serves as a line for the eye, so that if
the point of the tool is brought to the sight line, and the tool (C)
held level, you will always be able to maintain the correct angle. There
is no objection to providing a rest, for instance, like the cross bars
(D, D), but the artisan disdains such contrivances, and he usually
avoids them for two reasons: First, because habit enables him to hold
the tool horizontally; and, second, by holding the tool firmly in the
hand he has better control of it. There is only one thing which can be
said in favor of a rest, and that is, the stone may be kept truer
circumferentially, as all stones have soft spots or sides.
In the Use of Grindstones.—There are
certain things to avoid and to observe in the use of stones. Never use
one spot on the stone, however narrow the tool may be. Always move the
tool from side to side. Never grind a set of narrow tools successively.
If you have chisels to grind intersperse their grinding with plane bits,
hatchet or other broad cutting tools, so as to prevent the stone from
having grooves therein. Never use a tool on a stone unless you have
water in the tray.
 |
 |
|
Fig. 17. Correct.
|
Fig. 18. Incorrect.
|
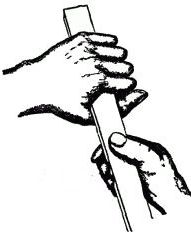
Correct Way to Hold Tool for Grinding.—There
is a correct way to hold each tool; see illustration (Fig. 17). The
left hand should grasp the tool firmly, near the sharp edge, as shown,
and the right hand should loosely hold the tool behind [Pg 25]
the left hand. There is a reason for this which will be apparent after
you grind a few tools. The firm grasp of the left hand gives you
absolute control of the blade, so it cannot turn, and when inequalities
appear in the grindstone, the rigid hold will prevent the blade from
turning, and thus enable you to correct the inequalities of the stone.
Bear in mind, the stone should be taken care of just as much as the
tools. An experienced workman is known by the condition of his tools,
and the grindstone is the best friend he has among his tools.
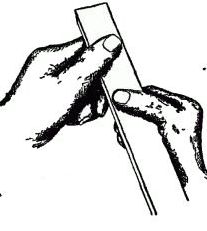
Incorrect Way to Hold Tool for Grinding.—The
incorrect way of holding a tool is shown in Fig. 18. This, I presume,
is the universal way in which the novice takes the tool. It is wrong for
the reason that the thumbs of both hands are on top of the blade, and
they serve as pivots on which the tool may turn. The result is that the
corners of the tool will dig into the stone to a greater or less degree,
particularly if it has a narrow blade, like a chisel.
Try the experiment of grinding a quarter-inch chisel by holding
it the incorrect way; and then grasp it firmly with the left hand, and
you will at once see the difference.
The left hand serves both as a vise and as a fulcrum, whereas the right hand controls the angle of the tool.
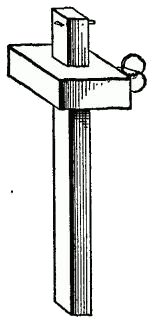 Fig. 19. Fig. 19.
These remarks apply to all chisels, plane bits and tools of
that character, but it is obvious that a drawknife, which is always held
by the handles in grinding, and hatchets, axes and the like, cannot be
held in the same manner.
A too common error is to press the tool too hard on the stone. This is wrong. Do not try to force the grinding.
Then, again, it is the practice of some to turn the stone away
from the tool. The stone should always move toward the tool, so as to
prevent forming a feather edge.
The Plane.—Indiscriminate use of
planes should be avoided. Never use the fore or smoothing planes on
rough surfaces. The jack plane is the proper tool for this work. On the
other hand, the fore plane should invariably be used for straightening
the edges of boards, or for fine surfacing purposes. As the jack plane
has its bit ground with a curved edge, it is admirably adapted for
taking off the rough saw print surface.
The Gage.—The illustration (Fig. 19)
shows one of the most useful tools in the kit. It is used to scribe the
thickness of the material which is to be dressed down, or for
imprinting the edges of tenons and mortises. Two should be provided in
every kit, for convenience.
The scribing point should be sharpened with a file, the point
being filed to form a blade, which is at right angles to the bar, or
parallel with the movable cheekpiece.
Chisels.—I have already pointed out,
in general, how to hold tools for grinding purposes, this description
applying particularly to chisels, but several additional things may be
added.
Always be careful to grind the chisel so its cutting edge is
square with the side edge. This will be difficult at first, but you will
see the value of this as you use the tool. For instance, in making
rebates for hinges, or recesses and mortises for locks, the tool will
invariably run crooked, unless it is ground square.
The chisel should never be struck with a hammer or metal
instrument, as the metal pole or peon of the hammer will sliver the
handle. The wooden mallet should invariably be used.
General Observations.—If the workman
will carefully observe the foregoing requirements he will have taken
the most important steps in the knowledge of the art. If he permits
himself to commence work without having his tools in first-class
condition, he is trying to do work under circumstances where even a
skilled workman is liable to fail.
Avoid making for yourself a lot of unnecessary work. The best
artisans are those who try to find out and know which is the best tool,
or how to make a tool for each requirement, but that tool, to be
serviceable, must be properly made, and that means it must be rightly
sharpened.
Chapter 3, How to Hold and Handle Tools
Back to Table of Contents
|